Cloud Console
You can manage your applications and channels in the LiveSwitch Cloud Console. You can also check your applications' Channel, Client, and Connection statistics reports in the Console. To access your Console, log into https://console.liveswitch.io.
Dashboard
The Dashboard is a landing page that shows your Applications' activity reports.
If you have more than one Application, you can switch between them by clicking the Change icon.
Clients and Connections
| Graph | Description |
|---|---|
| Clients | Total number of currently active clients. |
| Connections | Total number of currently active connections. The number count depends on your connection type. For example, if you have five clients, for an SFU connection type, there are 25 connections. for an MCU connection type, there are 10 connections. |
| Channels | Total number of active Channels. |
| Bandwidth | The bandwidth your application is using across all connected clients and servers. |
| Connections per Hour | Accumulated number of connections per hour for the past 12 hours. The graph time zone is UTC. |
| Connections per Day | Accumulated number of connections per day for the past seven days. |
Tip
You can create a connection to test out by clicking the CREATE A CONNECTION link. It creates an MCU connection using CodePen right away.

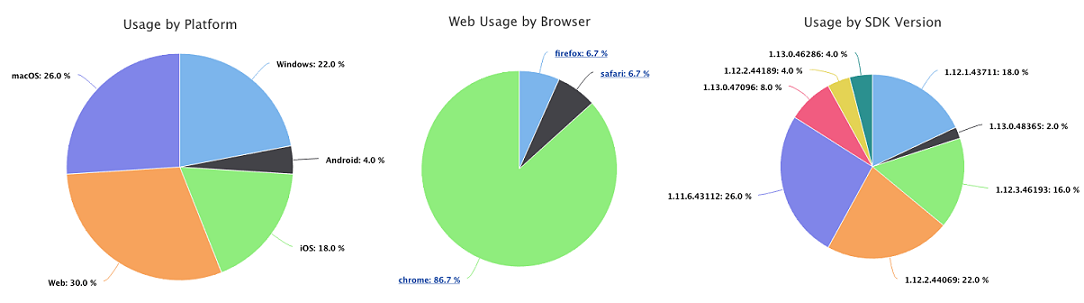
Usage Stats
This section provides several aggregate reports on your client platform and browser usages, and so on. With this information, you can target your app development effort in the right direction.
| Graph | Description |
|---|---|
| Usage by Platform | Which platforms your clients are using for the past 30 days ("Web" means any web app running on any operating system). |
| Web Usage by Browser | Which browsers your clients are using for the past 30 days. |
| Usage by SDK Version | Which versions of the SDK your clients are using for the past 30 days. You should always upgrade your SDK to the latest version. |
Unique IPs by Location
Your clients can connect from anywhere in the world. This section reports on the geographical distribution of your client connections so that you can target them with localized insights. Note that this chart is populated with your data an hour after connections are established.
Sessions
The Sessions page displays channel session activities for each application.
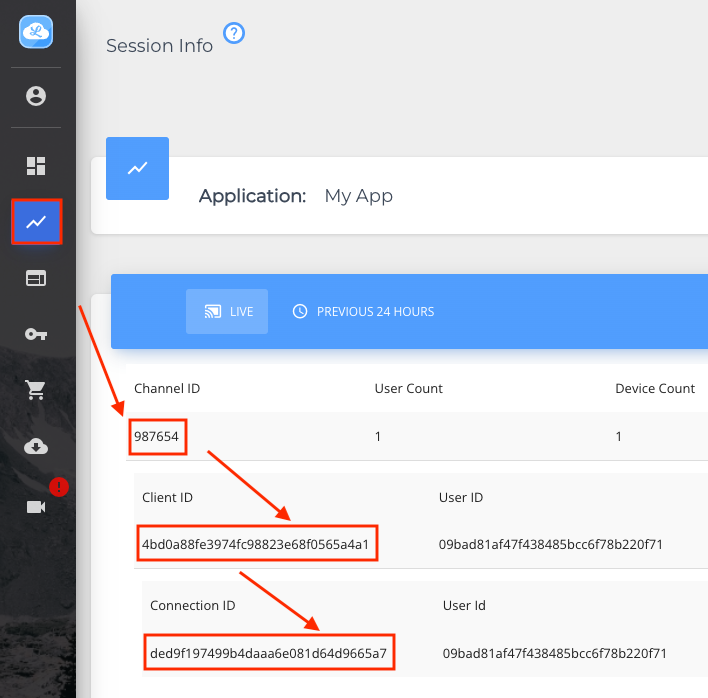
Session Information
If you have more than one application, you can switch between them by clicking the Change icon. For the selected application, it lists the following:
- Live shows real-time channel, client, and connection details for each session.
- Previous 24 Hours shows channel, client, and connection details for the last 24 hours for each session.
Connections Statistics
For a given connection, you can see the user, device, and client counts and IDs. You can also drill down to see statistical graphs that show the quality of your connections. For information about the relationship between users, devices, and clients, see Binding Hierarchy.
To see the statistics graphs:
click the Channel ID → the Client ID → the Connection ID.
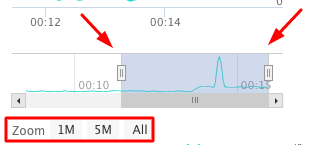
You can see video or audio connection statistics, or zoom in or out:
To see video connection statistics, click Video.
To see audio connection statistics, click Audio.
To zoom in or out, use the sliders, or click 1M (one minute), 5M (five minutes), or All (the entire time).
Note
The graphs only show the connection statistics from the client (sender) to the LiveSwitch Cloud server (receiver).
| Graph | Description |
|---|---|
| Bytes Sent | Bytes sent by the sender. |
| Bytes Received | Bytes received by the receiver. |
| Packets Sent | Packets sent by the sender. |
| Packets Received | Packets received by the receiver. |
| Packets Lost | Packets lost from the sender to the receiver. Packet loss can reduce the quality of the stream. |
| NACK Count | (Video only) NACK stands for Negative ACKnowledgement. NACK Count indicates how many times the receiver has sent a NACK packet after detecting that one or more packets were lost. |
| PLI Count | (Video only) PLI stands for Picture Loss Indication. PLI Count indicates how many times the receiver has lost a full-frame. |
| FIR Count | (Video only) FIR Stands for Full Intra Request. FIR Count indicates how many FIR packets the sender has received. The receiver sends an FIR packet to the sender any time it falls behind or loses packets and can't decode the incoming stream. The higher the FIR Count is, the more often frames were dropped, which may indicate that the media's bitrate is too high for the available bandwidth . |
| Jitter | When packets are sent, they might not be delivered in the sequence to the receiver. Since audio and video are time-sensitive, LiveSwitch collects the received packets and reorders them to the correct sequence. Jitter is the variation in the time between packets arriving. If the jitter is higher than 15-20 milliseconds, it can increase latency and result in packet loss. |
| RTT | RTT stands for Round Trip Time. RTT is the time between a request being sent and a response being received. |
Application Configuration
The Applications page displays a listing of your configured applications. Applications consist of one or more channels. Channels are what your clients join. You can configure media settings for specific channels. Applications have configuration properties shared by all clients, regardless of which channel they join. These properties are the application's Name, Shared Secret, and Webhook Configurations.
You can create as few or as many applications as you need. You can also add webhooks to trigger your external services, configure recording settings, or customize your SFU, MCU, and Codecs.
Note
The term "Application" is different from the term "App". App refers to your client application.
Name
Name of your Application. You can give your Application a human-readable name so that it's easy to identify.
Application ID
ID of your Application. The Application ID is read-only and can't be changed.
Gateway URL
The Gateway URL indicates the entry point for the Gateway and is used by LiveSwitch Media Servers and SIP Connectors.
Shared Secret
The Shared Secret is used to authenticate client join requests.
Webhook Configuration
What are Webhooks?
Webhooks are powerful tools that allow real-time communication between LiveSwitch and your external systems. They act as customizable event listeners, automatically sending notifications to your specified web server whenever key actions occur within LiveSwitch. This enables you to seamlessly integrate LiveSwitch events into your own applications and workflows.
Here's how it works:
- You define a webhook by specifying a URL for your server endpoint.
- LiveSwitch monitors for specific events you're interested in.
- When an event occurs, LiveSwitch sends an HTTP POST request to your URL.
- The request body contains detailed event information in JSON format.
- Your server can then process this data and respond accordingly.
With webhooks, you can build responsive, event-driven applications that leverage LiveSwitch's capabilities while seamlessly integrating with your existing infrastructure.
Webhooks are most commonly used to notify customers when a session's recording is ready for download. After a session ends, the system processes the recording by mixing audio and video from all participants into a single file. Once the mixed recording is ready, the system sends a notification via the registered webhook, allowing customers to download the complete recording without manually checking for updates.
Setting Up a New Webhook
To add a new webhook, in the console for the given application, click NEW and configure the following settings:
- Name: Name of the webhook; it doesn't have to be unique.
- URL: The server to which event information will be sent via a POST request. Both HTTP and HTTPS are supported, but HTTPS is recommended.
- Event Category: Choose which level the webhook applies to:
- Connection (application-level)
- Client (client-level)
- Channel (channel-level)
- Event Lifecycle: The events available for the given category. When triggered, events send a POST request to your configured webhook.
- Batch: Turn on the control to send multiple events in a single POST request. Otherwise, each event results in a separate POST request.
- Disabled: Turn on the control to disable all events.
For information on sample JSON object for each event, see Webhooks in the Developer Guides.
Channel Overrides Configuration
If your media configuration for an Application doesn't satisfy certain usages, you can resolve this by adding Channel overrides.
You can add unlimited number of channels for an Application and configure each channel for specific purposes. For example, clients might join a channel to stream audio and video from their mic and camera, and join a different channel specifically to stream screen capture video. For the former, you set up the default audio and video encoder configuration in the Application's Advanced Setup. For the latter, you add Channel Overrides to specify a different video encoding configuration.
To add Channel Overrides:
- Click New, and enter a Channel Pattern.
Note
The channel pattern supports the wildcard '*' character. When a client requests to join a channel, LiveSwitch assigns channels to the client that best matches in the order specified in the channel list. You can drag channels in the list to change their order.
- Set up the SFU, MCU, audio, video, and recording configurations that apply to that channel pattern.
Advanced Setup
LiveSwitch uses default media configurations. However, you can customize the media settings in the Advanced Setup section.
SFU Configuration
Set configuration options for Selective Forwarding Unit (SFU) connections. For more information on SFU connections, refer to the SFU section in the Stream Using SFU and MCU topic.
Limit SFU Upstream Bitrate
Set the maximum upstream audio bitrate and video bitrate by entering your desired values in Kbps in the Audio Input Max Bitrate and Video Input Max Bitrate fields. If not set, the default values are used.
Configure SFU Simulcast
LiveSwitch supports Simulcast, which allows multiple encoding per stream. In the Simulcast Config section, you can specify the maximum number of encodings per video input.
MCU Configuration
MCU stands for Multipoint Control Unit. MCU Configuration allows you to set configuration options for MCU connections. For information on how MCU connection works, see Stream using MCU.
Limit MCU Upstream Bitrate
You can set the maximum upstream audio bitrate and video bitrate by entering your desired values in kbps in Audio Input Max Bitrate and Video Input Max Bitrate. If not set, the default values are used.
Define Output Frame Resolution and Rate
To define the MCU video output frame resolution and rate, enter the desired value in Video Output Width, Video Output Height, and Video Output Frame Rate.
You should use the common resolutions because not all combinations are valid for all codecs. For example, 147x933 is not a valid resolution. You should also keep your frame rate to a reasonable value that is less than 30 frames per second.
Control MCU Layout
You can specify the margin between the frames in the output video in Video Input Margin.
If the input video frame is smaller than the output video frame, the output video fills the space with black bars. You can enable Crop Input Videos to enlarge the input video to fit the output video frame.
Configure MCU Simulcast
LiveSwitch supports Simulcast, which allows multiple encoding per stream. In the Simulcast Config section, you can specify the maximum number of encodings per video input.
Audio Codecs
Specify the audio codecs that you want to use in your app. By default, most audio codecs are enabled. If you disable too many codecs, the connection may fail if there are no available codecs. The supported codecs are:
- Opus
- PCMU
- PCMA
- G.722
Tip
You should always enable Opus. Opus can efficiently handle most use cases, from low-bandwidth calls to high-quality music. Set the maximum allowed bitrate in Kbps for Opus.
Note
The Max Bitrate is the downstream rate which means if you specify 1024, this is the maximum rate that's sent in the downstream connection.
Video Codecs
Specify the video codecs that you want to use in your app and, if necessary, the maximum bitrate in Kbps for each. By default, all video codes are enabled. If you disable too many video codecs, the connection might fail if there are no available codecs. The supported codecs are:
Note
The Max Bitrate is the downstream rate which means if you specify 1024, this is the maximum rate that's sent in the downstream connection.
Recording Configuration
Important
Recording is available for customers on the Professional or Enterprise subscription plans. For more information about these plans, contact Sales.
Set whether an Application has recording or muxing enabled. By default, a Channel uses the Application's recording configuration settings. However, you can override an Application's recording configuration settings in Channel Overrides Configuration.
You can now start or stop a recording on a channel. If you want to record a single session, you can use the SDK for a specific user, device, or connection. See Start or Stop a Recording on a Channel.
Notable Points
- There can be a maximum of 25 upstream connections for a muxed recording session.
- The minimum width x height for muxed recordings is 160 x 120 (120p).
- The maximum width x height for muxed recordings is 1920 x 1080 (1080p).
- The maximum frame rate is 60fps.
Note
Recordings don't expire, and recording storage up to 1 TB is included with the subscription. Additional storage can be purchased in 10 TB increments. For more information, contact Sales.
RTMP
RTMP is available for customers on the Standard, Professional, and Enterprise subscriptions plans, as well as those with Developer licenses. For more information about these plans or to enable them for your account, contact Sales.
Note
If you are using LiveSwitch Connect for broadcasting over RTMP, we recommend you to migrate your application from LiveSwitch Connect to in-product RTMP.
LiveSwitch supports sending RTMP streams to other servers that allow RTMP ingest for your application or channel.
RTMP supports up to five upstream participants.
To enable RTMP ingest from the console, do the following:
Enter the connection URL of the service you want to stream to.
Note
You must enter the RTMP protocol you are using in the connection URL. LiveSwitch supports RTMP and RTMPS.
Warning
RTMP URL can only be used by one active channel at a time. For more details, see RTMP Simultaneous Stream.
Enter the stream key of the service you want to stream to.
To automatically start RTMP when the channel is activated, turn the toggle switch on. To manually start RTMP through an SDK, turn the toggle switch off.
After you submit your changes to the console, do one of the following to start the RTMP stream on your channel:
- If your channel is active, restart it.
- If your channel is active but you can't restart it, start the RTMP stream with the LiveSwitch SDK.
- If your channel isn't active, activate it.
RTMP Simultaneous Stream
When configuring more than one channel, ensure that you are using different RTMP URLs. If you use the same RTMP URL in multiple channels, then a stream only starts for the first channel that attempts to activate the stream. The second stream to the same RTMP URL fails to establish a connection; however, the users can still connect. This doesn't impact the first stream. If you require RTMP to start on the second channel, you must deactivate the first channel and then you need to manually reactivate the RTMP stream on the second channel.
If your session requires clustering, the initial Media Server with an RTMP connection is prioritized. The subsequent connections and activated Media Server defers to the active RTMP stream as LiveSwitch allows only one attempt to start RTMP on the Media Server. When a channel is activated and streaming starts, RTMP is enabled regardless of any RTMP stream failures. When additional users join the channel on the same Media Server, additional attempts aren't made to start RTMP.
When the channel activates on a new Media Server which is unaware of any active RTMP streams from another source and attempts to establish an RTMP stream, the new RTMP connection fails and RTMP is flagged as enabled. However, the RTMP stream that is active on the initial Media Server is maintained.
API Keys
LiveSwitch Cloud REST API uses API keys to authenticate users. To send an HTTP request to the REST API, you must include a valid API key in the X-API-Key header. You can try out the REST API here.
To create an API key, click New and enter a tag for your key. You can use the same tag for different API keys. You can also edit or delete an API key.
Note
- The REST API limits 20 requests per API Key per second. Exceeding this limit results in a 429 Too Many Requests response.
- Any API call using a deleted key returns a 401 Unauthorized response.
Search Cloud Documentation
The search functionality on the Cloud console allows you to search the LiveSwitch Cloud documentation. To search for any documents related to LiveSwitch Cloud, click the ![]() icon. The search box appears. Start typing the text in the search box; search results appear in a dropdown list. You can either select the desired result from the dropdown list, or hit Enter to see more results. When you select a result, it opens the server documentation in a new tab. If you don't find the required result in the popup window, you can close the popup window.
icon. The search box appears. Start typing the text in the search box; search results appear in a dropdown list. You can either select the desired result from the dropdown list, or hit Enter to see more results. When you select a result, it opens the server documentation in a new tab. If you don't find the required result in the popup window, you can close the popup window.
Note
If you don't find the documentation that you are looking for, either contact LiveSwitch Support by submitting a request or leave us documentation feedback.
Subscription
The Subscription page allows you to view the details of your LiveSwitch Cloud subscription. If you want to make changes to your subscription plan, contact Sales.
Downloads
The Downloads page allows you to download the latest version of the client SDK.
Recordings
You can search, download, or delete your muxed channel recordings and unmuxed connections recordings.
Note
Recordings don't expire, and recording storage up to 1 TB is included with the subscription. Additional storage can be purchased in 10 TB increments. For more information, contact Sales.
Search for a Recording
To search for a recording, use the following parameters:
- Application ID: ID of the Application for the recordings.
- Channel ID: ID of the channel for the recordings.
- Timestamp Min: Date and time that the recording started.
- Timestamp Max: Date and time that the recording stopped.
- Muxed Only: Whether or not the recordings are muxed.
Refine search results in the following ways:
- Limit the amount of results to display per page.
- Sort search results by column. By default, search results are sorted by Start Timestamp.
Download a Recording
You can download both the muxed channel recordings and unmuxed connections recordings. When the Muxed Only checkbox is selected, only channel recordings are returned. Each recording event in the search results is a session. You are limited to one download at a time.
To download a recording, click the export ![]() icon in the row of the recording you want to download. The selected recording is downloaded in the Downloads folder on your computer.
icon in the row of the recording you want to download. The selected recording is downloaded in the Downloads folder on your computer.
- If the recording event (session) has a muxed channel recording, then a pop up menu opens with the following options:
- Muxed Recording - Select this option to begin a direct download for one muxed channel recording file.
- Individual Recordings - Select this option to begin a direct download of all individual connection recording audio and video files in a single ZIP file.
- If the recording event (session) doesn't have a muxed channel recording, then a pop up menu doesn't open. It simply begins a direct download for all individual connection recording files in a single ZIP file containing all the unmuxed video and audio recordings.
Important
When the download starts, the modal box must remain open. Closing the modal box cancels the download.
Delete a Recording
To delete both the muxed channel recordings and unmuxed connections recordings, click the delete ![]() icon in the row of the recording you want to delete.
icon in the row of the recording you want to delete.